3CX Web Client
The 3CX Web Client is easy to use and combines all the features you need to efficiently communicate, collaborate and connect with colleagues, partners and customers, straight from your browser or from the native Windows desktop app. From this one interface, you can easily make calls, view the status of colleagues, hold a video conference, and communicate with customers via voice, live chat, Facebook messaging and SMS/ MMS.
Let’s get started: Logging on

- Go to the “Your User Account on your New 3CX System” email.
- Click on your web client URL, e.g. https://mycompany.3cx.com/webclient/
- Log in using the credentials in your email or with your Google or Microsoft 365 account.
If you’ve lost your Welcome Email you can have it re-sent via the smartphone app (iOS or Android).
Download the Desktop App
The Desktop app for Windows includes all of the features of the web client but provides a more native experience. To download the app:
- Click on the Windows icon
 at the top of the side menu in the web client.
 - Follow the steps to install and provision the app.
Start a call
To call, click on the dial pad in the top right menu or click on the search icon. Enter the phone number or search by name, extension number or email address.
Choose your device to place a call

You can seamlessly place calls from your IP phone, the iOS or Android app, web client or the desktop app – wherever you have provisioned your extension. From the phone selector in the web client’s dialer, you can select your preferred device and control calls from the web client interface.
In-call functions
Once you’re in a call, you can perform a number of actions with just a few mouse clicks.
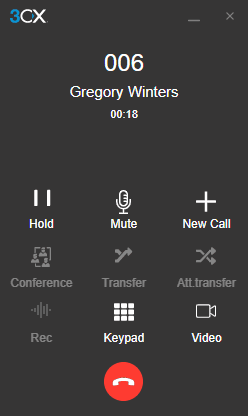
Transferring a call
Click on “Transfer” and enter the name or number of the person you want to transfer the call to. The call is transferred without you speaking to the receiver on the other end – this is known as a blind transfer.
To speak to the receiver and get permission to transfer a call, click “Att.transfer”. This will allow you to put the caller on hold and speak to the receiver before passing the call through.
Creating a conference call
Click the “Conference” button and enter the name or number of the person/s you would like to add to the call. They will be dialled and upon answering, will be added to the existing call.
Recording a call
At any time during a call you may record the conversation. Simply click “Record” to begin and click again to end the recording. Recordings can be accessed in the Web Client > “Recordings”.
Note: The ability to record and to view/edit recordings depends on the permissions given to you by your administrator.
Initiating a new call
During an ongoing call, you may initiate a new call on a separate line without hanging up on the current call. To do this, click “New Call” and enter the name or number of the callee.
Switch to video call
During an ongoing call, you may elevate to a video call by clicking the “Video” icon in the dialpad, without hanging up on the current call.
Manage your status & queues
The “Status” feature allows you to see which colleagues are available to take calls. Avoid distractions and set your own status to let others know when you’re away or you don’t want to be disturbed.
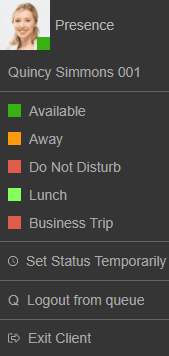
- Click your avatar in the top left and choose from Available, Away, Do Not Disturb, Lunch, Business Trip.
- Your status changes to yellow when your line is busy.
- Click on your avatar to select “Set status temporarily” to time-limit your status.
- From this menu you can also login and out of queues.
Customize status message and behaviour by clicking on “Avatar > Your Name > Status”.

Here you can:
- Set a custom message
- Enable/disable Push notifications for each status
- Rename “Lunch” and “Business Trip” profiles
- Set the number of seconds to activate forwarding of unanswered calls for “Available” and “Lunch” profiles
- Choose to forward unanswered calls to options such as: Voicemail, mobile etc
- Override forwarding rules based on Caller ID and time of the call
Chat with colleagues and customers
In the “Web Client > Chat” section, you can send and receive instant messages with colleagues as well as live chat, SMS/MMS and Facebook messages from customers.
Find out more about composing chats and SMS, and the various chat functions available in the business chat manual.
Start a video conference
In the “Web Client > Meet”, you can start a video conference or schedule a conference. Find out more about video conferencing and its features in the Video Conferencing manual.
Set up Hotkeys
Hotkeys enable you to set up a bespoke combination of keystrokes to execute a number of supported operations on calls, such as opening the dialer, answering an incoming call, initiating a blind transfer, and so on.
- Open the 3CX Desktop Application.
- Click “More”
 on the left side navigation panel and select “Settings”.
 - From the dropdown menu in the top right of the screen, select “Hotkeys”.
- On each line, click the pencil icon which then allows you to simply press the key combination desired.
Note: Configured keys will be kept as part of Local Storage and will be used only by the Desktop App. Do not use Hot Key combinations that are used for your operating system. Combinations set on 3CX Desktop App will overwrite whatever shortcuts the apps/OS is using and it will be applied globally.